
Dinner Party Menu: December
Blini with Crème Fraîche and Salmon Caviar
Roasted Tomato and Fennel Soup
Beef Croustades with Boursin and Mushrooms
Chocolate Tart
Our December menu may come just in time for a celebratory New Year’s dinner. Or, one or two of the recipes may be just right for a more casual meal.
Warm Yukon Gold Blinis with Salmon “Caviar” and Crème Fraîche
This recipe is on Julie’s website where she has many more appetizing ideas.
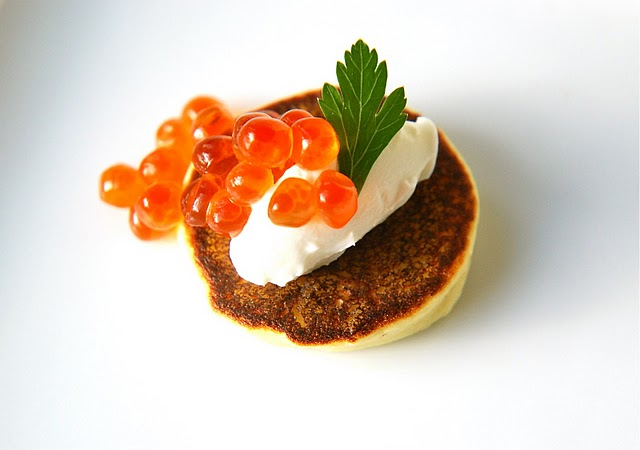
Photo with thanks to Julie Marr
Just like making pancakes the first blini is a bit of a throwaway, so use it as your learning curve to determine the correct heat level for your pan. No butter is needed to cook the blinis as long as you use a good quality non-stick pan. You can, of course, use sour cream in place of the crème fraîche, and top with smoked salmon or other fish.
For the blinis:
1 lb. Yukon Gold Potatoes, skins on
2 tablespoons flour
1 tablespoon crème fraîche
2 large eggs
1 large egg yolk
1 to 2 tablespoons of milk
Fine sea salt and freshly ground white pepper
For the garnish:
2 ounces of salmon roe (also called Ikura)
¼ cup crème fraîche
Parsley leaves for garnish (optional)
To make the blinis:
Place the un-peeled potatoes in a medium pot with enough salted water to cover the potatoes. Bring to a boil and simmer until the potatoes are thoroughly cooked. Drain the potatoes and when they are still warm (but cool enough to handle) peel the potatoes and press them through a fine mesh sieve or a potato ricer. Place the potatoes into a medium bowl and quickly work in the flour with a fork and then add it the crème fraîche and mix well. Add the eggs one at a time, followed by the egg yolk and mixing well after each egg is added. Season well with salt and white pepper
At this stage the batter should resemble a somewhat thick pancake batter. If is is really thick then add in 1 to 2 tablespoons of milk to achieve the right consistency.
Preheat a nonstick pan over medium heat and allow it to heat up thoroughly. Spoon about 1 1/2 teaspoons of the batter into the hot pan and allow to cook for approximately 2 minutes and the bottom is golden brown. Flip the blini and allow to cook on the other side for an additional minute.
Remove to a small sheet pan and keep warm is a 200 degree oven while you cook the remaining blinis.
To serve:
Place the blinis on a serving platter and place a dollop (or a small quenelle if you are feeling super fancy) of crème fraîche in the centre of the blini. Place another small dollop of the salmon roe on top and garnish with a sprig of parsley.
Makes 40 canapés.
Roasted Tomato and Fennel Soup
Roasting the vegetables for this soup gives it a deep and rich flavour that improves with time, making it an ideal make-ahead recipe. It can be made 2-3 days in advance. It is healthy but filling, so I recommend serving it in small bowls if you are following this entire menu.
4 lbs. fresh tomatoes, halved lengthwise
6 garlic cloves
1 medium red onion, quartered, not peeled
1 medium-sized fennel bulb, trimmed and sliced into thick wedges
3 tablespoon olive oil
1 teaspoon salt
½ teaspoon pepper
2 tablespoons unsalted butter
1 large shallot, peeled and sliced
1 teaspoon sugar
1 teaspoon fennel seeds
1-14oz. tin diced tomatoes
3½ cups chicken, turkey or vegetable stock (you may need more liquid: if so, add more stock or water)
salt and pepper to taste
Preheat oven to 350°. Put tomatoes, garlic, onion and fennel on a large baking sheet. Drizzle with olive oil and season with salt and pepper. Roast about 1 hour, or until vegetable are soft and slightly caramelized, then cool slightly. Peel the garlic cloves and the onion.
Sauté the shallot, sugar and fennel seeds in butter until the shallot is softened but not browned. Add the tin of diced tomatoes, the roasted vegetables and stock and simmer, covered for 20 minutes. Purée mixture in blender. If soup needs more liquid, add more stock or water. Season to taste with salt and pepper and and garnish with cheese straws, if desired.

Photo with thanks to Julie Marr
Beef Croustades with Boursin and Mushrooms
This is a decadent dish, perfect for a special meal. It can be assembled in stages and ready for final baking well in advance. Julie kindly offered her recipe and to demonstrate how it’s done, which I captured on my iPhone.
Mushroom filling:
1 lb. white button or crimini mushrooms, cleaned
2 medium shallots
1 clove garlic, cut in half
2 tablespoons unsalted butter
1 tablespoon olive oil
¼ cup chopped parsley
salt and pepper
Croustades:
6 beef tenderloin steaks 5-6 oz. each, about 1¾” thick
salt
1 tablespoon butter
1 tablespoon olive oil
1 package peppercorn or herb Boursin cheese, slightly softened
1 lb. phyllo dough, thawed in the refrigerator overnight
¼ lb. butter, melted, or more if needed
¼ cup thinly sliced chives
For the filling: Trim the mushroom stems close to the caps. Put the mushrooms, shallots and garlic in a food processor and pulse until finely chopped but not puréed, scraping the bowl as needed. Or, you can chop all of these ingredients by hand if you don’t have a processor. Transfer the chopped mushrooms to the centre of a clean dish towel. Gather up the sides of the towel and twist, keeping the mushrooms well contained in the cloth, bonbon style. With one hand, hold the ball of mushrooms over the sink, and with the other hand, twist the gathered cloth, squeezing out as much liquid as possible.
Heat the butter and oil in a 10” skillet over medium heat. Add the mushrooms, cover, and cook stirring occasionally until the mushrooms are soft and fragrant, 3-5 minutes. Add the parsley and season with salt and pepper to taste. This mixture can be made up to 2 days ahead, covered and refrigerated.
For the croustades: Season the tenderloins generously on all sides with salt. Heat the butter and oil in a sauté pan over medium-high heat until very hot. Put three tenderloins in the pan and sear on one side until browned, 1-2 minutes. Turn and brown the other side. Transfer to a plate lined with paper towels. Repeat with the remaining filets. Cover and refrigerate for at least one hour.
To assemble: Mash the Boursin with a fork in a small bowl until spreadable. Remove phyllo from package and lay the stack on the counter. Take one sheet of phyllo from the stack and cut into 4 squares. Cover the remaining phyllo with a damp dish towel while you assemble each croustade. Brush squares with melted butter and sprinkle with ½ teaspoon of chives.
Make four layers, omitting chives from last layer, with the corners of the phyllo pointing in a different direction, star-like. Blot one tenderloin dry with a paper towel, set it in the centre of the star, and sprinkle it with salt. Spread about 1 tablespoon of the Boursin on the filet and top that with 2 tablespoons of the mushroom filling.

Pick a starting point and work your way around the filet, gathering the edges of the phyllo star together. Lightly pinch together the gathered phyllo close to the surface of the meat to hold it in place. Pull the corners open slightly as if making a paper flower. Brush the whole exposed surface lightly with more butter being sure that the bottom is buttered as well. Transfer to a heavy baking sheet. Repeat this process for the remaining tenderloins. If you are working ahead, chill the tenderloin packages uncovered on the baking sheet until ready to bake, up to 2 days.

To bake: Take the croustades out of the refrigerator about 20 minutes before you are ready to bake them. Position the oven rack in the lower third of the oven and heat the oven to 400ºF. Bake the croustades for 17-22 minutes depending on how well done you prefer tenderloin, rotating the baking sheet after 10 minutes to ensure even browning. Serve immediately. Julie served hers on top of roasted carrots and garnished it with quickly sautéed brussel sprout leaves.

Photo with thanks to Julie Marr
Chocolate Tart
This tart can be made 1-2 days ahead and can serve at least 12 people as it is rich and chocolatey. The recipe is slightly adapted from Gjelina, Cooking from Venice, California.
For the crust
1 cup all-purpose flour
½ cup unsweetened cocoa powder
1 cup ground almonds
½ cup ground pine nuts, pistachios or pecans
½ teaspoon Kosher salt
1 cup unsalted butter, room temperature
¾ cup sugar
For the chocolate filling
1 cup unsalted butter
2½ oz. bittersweet chocolate
1½ tablespoons cocoa powder
½ cup packed light brown sugar
½ teaspoon Kosher salt
4 eggs
pomegranate seeds and whipped cream, for garnish
For the crust: In a medium bowl, combine the flour, cocoa, ground almonds, nuts and salt. Set aside.
In a mixmaster fitted with the paddle attachment, beat the butter and sugar on medium speed until fluffy, about 2 minutes. Turn the mixer speed to low and add the flour mixture, and mix until just combined. Transfer the dough to a sheet of parchment paper. Place another sheet of parchment on top and roll out the dough to a ⅛” thick round, 12-13” in diametre. Refrigerate for at least 2 hours, or overnight.
Preheat the oven to 350ºF. Butter a 10” tart pan with a removable bottom. Press the dough into the bottom and sides of the pan. The dough will probably crack, but just press it back together. Bake for 10-15 minutes until firm to the touch. Don’t worry if the crust shrinks down the sides a bit as it bakes. Transfer the pan to a wire rack to let cool. Lower the oven temperature to 325ºF.
For the filling: Set a large heatproof bowl over 1” water in a large saucepan over medium heat. Add the butter and chocolate to the bowl and melt, stirring occasionally, until smooth. Whisk in the cocoa powder, and then add the brown sugar and salt. Continue whisking until the sugar is dissolved and the mixture is shiny. Add the eggs, one at a time, incorporating each one before adding the next.
To bake: Pour the filling into the tart and bake until it puffs up slightly and the surface is shiny, like a brownie. The centre should be just set and does not jiggle when you shake the pan, about 35 minutes. Remove from the oven and let cool in the pan on a wire rack for 40 minutes. Gently remove the sides of the pan.
Slice and serve with some whipped cream and a sprinkle of pomegranate seeds.

Photo with thanks to Julie Marr

 Photo with thanks to Julie at


 I can’t remember a time when food was not an important part of my day. From an early age, I observed and participated in the kitchens of my mother and two grandmothers.